Flutter Tutorial - How to build Beautiful Login Screen with Google Sign - Part I
16 Jun 2020 | Saheb Singh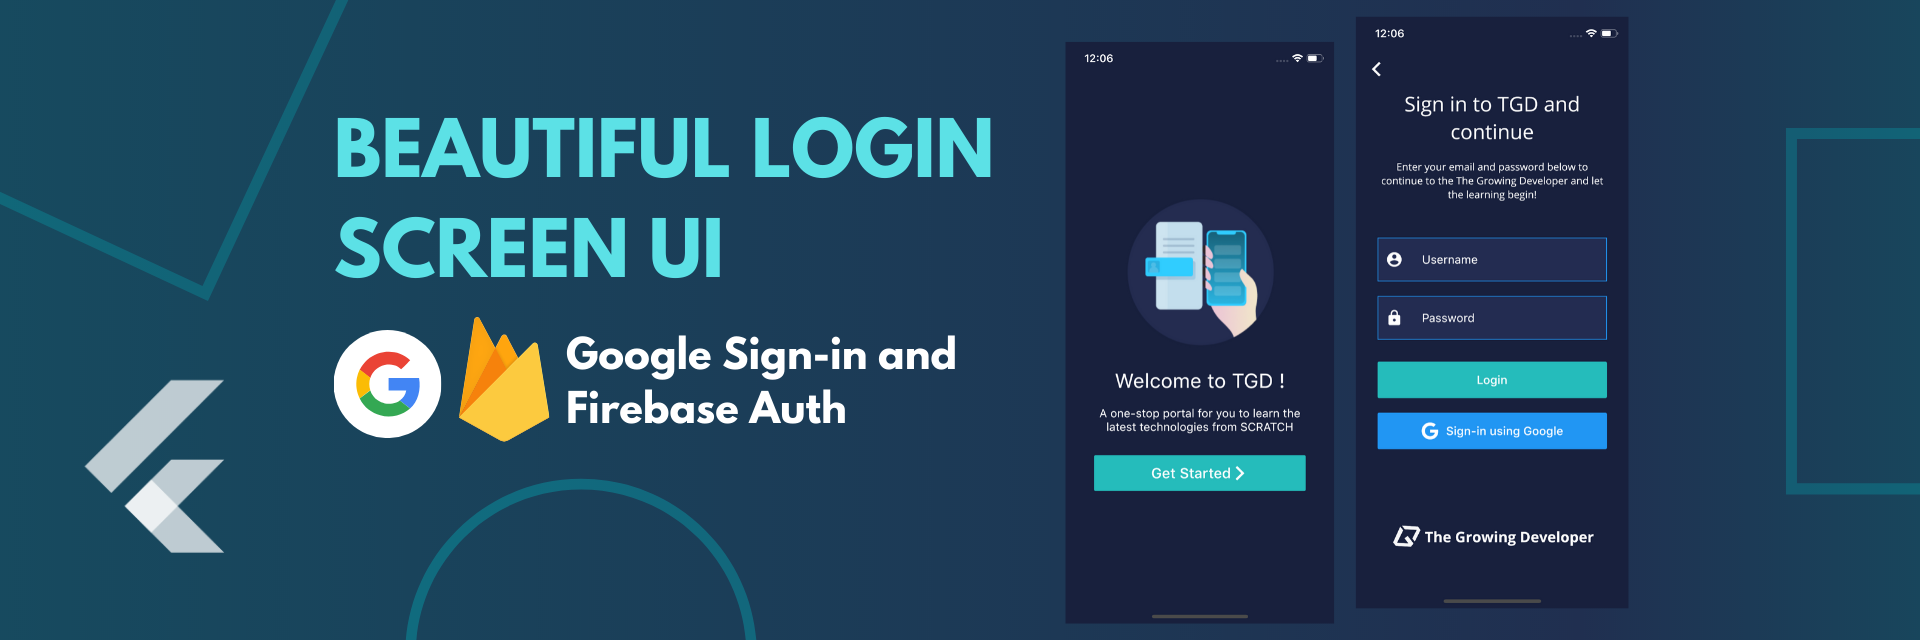
Every App Nowadays requires the user to Login/SignUp to give the users more functionality and give personal results related to the user activity. Hence, it becomes equally important to build a clean and expressive login screen. But what will the user do with the Login Screen if it is not working properly? So, adding the functionality along with the UI is equally important.
Keeping both the aspects in mind, Let's start this tutorial and see how we can an amazing UI and add sign-in functionality to it as well. As Login Screen is mostly the first screen any user sees, it's important to leave a good impression. After all, "First Impression is the Last Expression".
What we will build today :
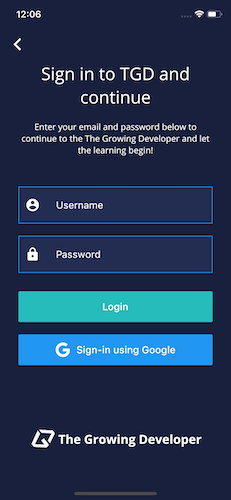
Let's take a look at the UI that we will build in this tutorial before getting into the actual coding stuff so that we have a clear picture of what we require to build. Here it is :
Steps to follow :
Let's look at the steps below that are needed to get our working and Google Sign In works seamlessly on our devices.
- Setting Up Firebase Project and Adding the required configuration in our Flutter project
- Install the required packages
- Building the UI
- Adding the methods for Google Sign-In using Firebase Auth
1. Setting Up Firebase Project for Android & iOS
Setting Up Firebase for Android and iOS can be challenging for some if not done properly. This step is the most important step to be done so I have made a video on the same on my youtube channel as I personally feel that detailed video is best to understand all the steps. For your ease, I am embedding the video right below.
2. Install the required packages
Following packages will be required to make google sign-in and firebase auth work in your app. Open your pubspec.yaml file and add the below lines of code in it to install the required packages.
  firebase_auth: // For Firebase Authentication
  google_sign_in: // For Google Sign-in
  font_awesome_flutter: // For adding the Google Icon
  google_fonts: //Adding Google Fonts to make our app look better and clean
Note : Plugins makes most of the work in Flutter easy. You can learn more about these plugins on pub.dev
3. Building the UI
I have broadly classified this app's UI into two main screens
- Getting Started Screen
- Login Screen
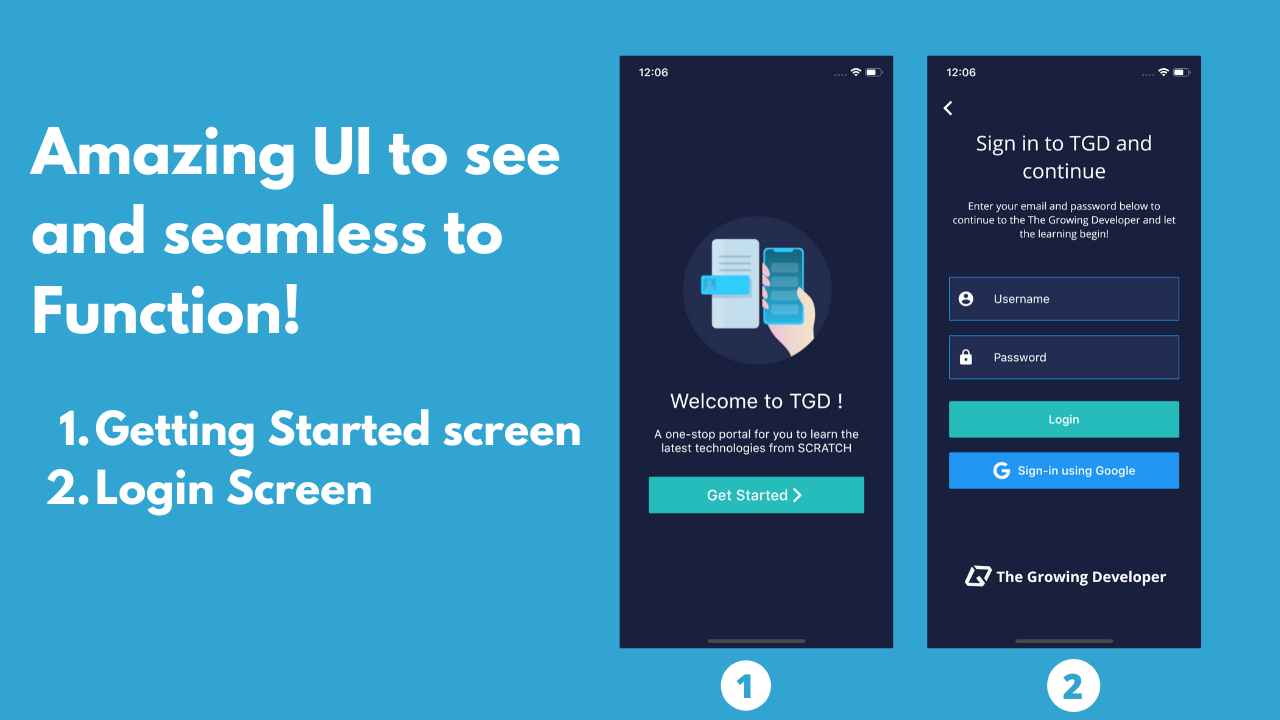
1. Getting Started Screen
Our Screen will look something like this. We will use A Column to align the elements vertically. There are three elements in this screen
- Image
- Text that is being displayed
- Our Get Started Button
Below is the code for same. In the body of your Scaffold widget write the below code.
Note : Don't forget to add the desired image in pubspec.yaml file
 body: Column(
              mainAxisAlignment: MainAxisAlignment.center,
              children: <Widget>[
                //We take the image from the assets
                Image.asset(
                  'assets/splash-image.png',
                  height: 250,
                ),
                SizedBox(
                  height: 20,
                ),
                //Texts and Styling of them
                Text(
                  'Welcome to TGD !',
                  textAlign: TextAlign.center,
                  style: TextStyle(color: Colors.white, fontSize: 28),
                ),
                SizedBox(height: 20),
                Text(
                  'A one-stop portal for you to learn the latest technologies from SCRATCH',
                  textAlign: TextAlign.center,
                  style: TextStyle(color: Colors.white, fontSize: 16),
                ),
                SizedBox(
                  height: 30,
                ),
                //Our MaterialButton which when pressed will take us to a new screen named as
                //LoginScreen
                MaterialButton(
                  elevation: 0,
                  height: 50,
                  onPressed: () {
                    Navigator.push(context,
                        MaterialPageRoute(builder: (_) => LoginScreen()));
                  },
                  color: logoGreen,
                  child: Row(
                    mainAxisAlignment: MainAxisAlignment.center,
                    children: <Widget>[
                      Text('Get Started',
                          style: TextStyle(color: Colors.white, fontSize: 20)),
                      Icon(Icons.arrow_forward_ios)
                    ],
                  ),
                  textColor: Colors.white,
                )
              ],
            ),
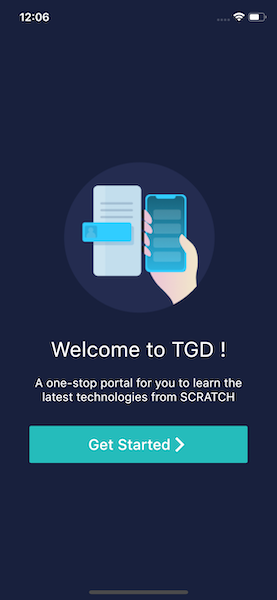
2. Login Screen
The Structure for this screen as somewhat similar to our first screen but with the difference that we have TextFields and we had to use SingleChildScrollView to make our Column scrollable and thus eliminating RenderFlex Overflow errors.
Here is the code I wrote for this
Note : Focus on How I styled my TextField in the _buildTextField method and the way I passed the respective data to them
class LoginScreen extends StatelessWidget {
  final Color primaryColor = Color(0xff18203d);
  final Color secondaryColor = Color(0xff232c51);

  final Color logoGreen = Color(0xff25bcbb);

  final TextEditingController nameController = TextEditingController();
  final TextEditingController passwordController = TextEditingController();

  @override
  Widget build(BuildContext context) {
    return Scaffold(
        appBar: AppBar(
          backgroundColor: Colors.transparent,
          elevation: 0,
        ),
        backgroundColor: primaryColor,
        body: Container(
          alignment: Alignment.topCenter,
          margin: EdgeInsets.symmetric(horizontal: 30),
          child: SingleChildScrollView(
            child: Column(
              mainAxisAlignment: MainAxisAlignment.center,
              crossAxisAlignment: CrossAxisAlignment.center,
              children: <Widget>[
                Text(
                  'Sign in to TGD and continue',
                  textAlign: TextAlign.center,
                  style:
                      GoogleFonts.openSans(color: Colors.white, fontSize: 28),
                ),
                SizedBox(height: 20),
                Text(
                  'Enter your email and password below to continue to the The Growing Developer and let the learning begin!',
                  textAlign: TextAlign.center,
                  style:
                      GoogleFonts.openSans(color: Colors.white, fontSize: 14),
                ),
                SizedBox(
                  height: 50,
                ),
                _buildTextField(
                    nameController, Icons.account_circle, 'Username'),
                SizedBox(height: 20),
                _buildTextField(passwordController, Icons.lock, 'Password'),
                SizedBox(height: 30),
                MaterialButton(
                  elevation: 0,
                  minWidth: double.maxFinite,
                  height: 50,
                  onPressed: () {},
                  color: logoGreen,
                  child: Text('Login',
                      style: TextStyle(color: Colors.white, fontSize: 16)),
                  textColor: Colors.white,
                ),
                SizedBox(height: 20),
                MaterialButton(
                  elevation: 0,
                  minWidth: double.maxFinite,
                  height: 50,
                  onPressed: () {
                  //Here goes the logic for Google SignIn discussed in the next section
                   },
                  color: Colors.blue,
                  child: Row(
                    mainAxisAlignment: MainAxisAlignment.center,
                    children: <Widget>[
                      Icon(FontAwesomeIcons.google),
                      SizedBox(width: 10),
                      Text('Sign-in using Google',
                          style: TextStyle(color: Colors.white, fontSize: 16)),
                    ],
                  ),
                  textColor: Colors.white,
                ),
                SizedBox(height: 100),
                Align(
                  alignment: Alignment.bottomCenter,
                  child: _buildFooterLogo(),
                )
              ],
            ),
          ),
        ));
  }

  _buildFooterLogo() {
    return Row(
      mainAxisAlignment: MainAxisAlignment.center,
      children: <Widget>[
        Image.asset(
          'assets/tgd_white.png',
          height: 40,
        ),
        Text('The Growing Developer',
            textAlign: TextAlign.center,
            style: GoogleFonts.openSans(
                color: Colors.white,
                fontSize: 20,
                fontWeight: FontWeight.bold)),
      ],
    );
  }

  _buildTextField(
      TextEditingController controller, IconData icon, String labelText) {
    return Container(
      padding: EdgeInsets.symmetric(horizontal: 10, vertical: 5),
      decoration: BoxDecoration(
          color: secondaryColor, border: Border.all(color: Colors.blue)),
      child: TextField(
        controller: controller,
        style: TextStyle(color: Colors.white),
        decoration: InputDecoration(
            contentPadding: EdgeInsets.symmetric(horizontal: 10),
            labelText: labelText,
            labelStyle: TextStyle(color: Colors.white),
            icon: Icon(
              icon,
              color: Colors.white,
            ),
            // prefix: Icon(icon),
            border: InputBorder.none),
      ),
    );
  }
}
4. Adding Methods for Google Sign-In
We have added the UI and the UI looks amazing and materialistic. Now is the time to add some functionality to our buttons. Do you remember that we installed google_sign_in and firebase_auth package in our second step? Let's use them! Here is the code for adding Google sign-in in our application.
  _signInWithGoogle() async {
    final GoogleSignInAccount googleUser = await googleSignIn.signIn();
    final GoogleSignInAuthentication googleAuth =
        await googleUser.authentication;

    final AuthCredential credential = GoogleAuthProvider.getCredential(
        idToken: googleAuth.idToken, accessToken: googleAuth.accessToken);

    final FirebaseUser user =
        (await firebaseAuth.signInWithCredential(credential)).user;
  }
I have made a video for the same and it's available on my Youtube channel as well. I have embedded the video below where I address most of the Firebase Set-up issues. don't forget to watch it tell end to solve all of your Firebase related problems.
Conclusion
So Finally we reach the end of this article. I think this is the time to wrap up this blog. Hope you are able to learn a lot from this and are able to solve most of your Firebase related problems. A video tutorial for the same will be uploaded soon on the Growing Developer Youtube Channel. That's all from my side. For any queries you can directly connect with me through my social platforms. All the links are in the footer of this page and in the description of my Youtube Videos as well.
Happy Coding !
Take Your UI skills to the next level
Read this tutorial to learn to build an Amazing Wallet UI
Read Tutorial