PageView and PageController | Flutter Tutorial for Beginners
23 May 2020 | Saheb Singh
Mobile apps are ever changing in today's world and the ability to swipe between different pages and widgets has become one of it's most important aspects. Flutter provides a lot widgets to make many complex UI and to add scrolling pages to our app, we can use PageView() widget. This widget is so easy to implement and control. Without causing any further delay, let's start the tutorial.
Take a look at the screenshot below to understand the UI that we are gonna make in this tutorial.
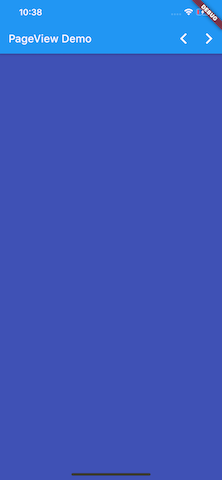
The UI contains a PageView as the main element in the body of the Scaffold. The indigo color that you see in the middle is nothing else but a full sized Container which is a part of the Pageview(), I have three Containers each having different colors. You can place your screens in place of these Containers.
If you see the app bar, there are two arrows that can be used to change the pages. The video for the same is now uploaded on The Growing Developer youtube channel. I am embedding the video down below for your convenience.
PageView
PageView can be used at any place where you want different scrollable elements.In my case I am using the PageView directly inside the body parameter of the Scaffold widget. Copy the below code in your Scaffold's body parameter and I'll explain it in detail.
 PageView(
      pageSnapping: true,
      controller: pageController,
     onPageChanged: (index) {
       setState(() {
          pageChanged = index;
          });
        print(pageChanged);
        },
     children: [
       Container(
          color: Colors.indigo,
                ),
      Container(
          color: Colors.red,
                ),
       Container(
          color: Colors.brown,
                ),
        ],
      ),
- pageSnapping : Page Snapping is used to determine whether you want the page wise or scroll wise. By default, pageSnapping is true. If you set pageSnapping value to false, then the child will be scrolled based on your swipe , whereas if the value is set to true , on swipping the complete child get's scrolled.
- controller : This takes up the instance of PageController. Page Controller is used to handle stuff on your scroll positions and can be used to programmatically scroll your PageView.
- children : This takes up a list of widgets , which you want to be swiped in your desired direction. I have passed three Containers of different colors for demonstration purpose.You can add any widget or any screen in the list here.
- onPageChanged : onPageChanged takes up a method of type void function(int index) which passes the current changed page as a parameter and we can write our login in here. I used a variable named pageChanged to keep track of the current page.
PageController - Declaration and it's use
The PageController can be instantiated as other objects like
PageController pageController = PageController();
This pageController was then passed to the controller property of the PageView(). To programmatically change the pages of the PageView we can use the animateToPage or animateTo methodsd of the pageController.
animateToPage method :
This method takes up three parameters :
- pageNumber : the page number you want to move
- duration : what should be the duration of the animation
- curve : You can choose between different Curves available to give it a cool scrollinng effect
Buttons in the AppBar to change the pages on tap of the button
AppBar(title: Text('PageView Demo'),

      actions: [
        IconButton(icon: Icon(Icons.arrow_back_ios), onPressed: (){
          pageController.animateToPage(--pageChanged, duration: Duration(milliseconds: 250), curve: Curves.bounceInOut);
        }),
        IconButton(icon: Icon(Icons.arrow_forward_ios), onPressed: (){
          pageController.animateToPage(++pageChanged, duration: Duration(milliseconds: 250), curve: Curves.bounceInOut);

        }),


      ],
As you can see that we incremented and decremented the pageChanged value accordingly to change the Page index in our pageView and animateToPage method was used.
That'all for the this tutorial, Hope it helped in some manner and you are able to learn something from this. You can support me by subscribing to my youtube channel. You can also donate the money using the links available in the author section.
Happy Coding !