Using Sqflite in Flutter Application
30 Apr 2020 | Saheb Singh
I searched through the internet and searched even more,but in some other ways I couldn't find any satisfactory example and code explaining the sqflte plugin and how i can perform CRUD operations by creating a local database in our application.
Many viewers on my youtube channel requested to make a video on implementng Sqflite with a simple application and If you wish to see the video and understand the working, here it is:
The tutorial will be divided into three parts:
-
Adding the required depencies
- Create a DataBase Helper class
- Basic UI with some buttons to perform CRUD operations
1.Adding the required depencies:
Create a new flutter project and go to your pubspec.yaml file.You need to add the following lines under the dependency section (usually below cupertino_icons: library) :
- path_provider
- sqflite
Your pubspec.yaml should look like this :
sqflite: ^1.2.0
path_provider: ^1.5.1
2.Database Helper Class:
Make a new file named as _database_helper.dart _in your lib folder, copy the below code and I'll explain it further
import 'dart:io';

import 'package:path/path.dart';
import 'package:sqflite/sqflite.dart';
import 'package:path_provider/path_provider.dart';

class DatabaseHelper {

  static final _databaseName = "MyDatabase.db";
  static final _databaseVersion = 1;

  static final table = 'my_table';

  static final columnId = '_id';
  static final columnName = 'name';
  static final columnAge = 'age';

  // make this a singleton class
  DatabaseHelper._privateConstructor();
  static final DatabaseHelper instance = DatabaseHelper._privateConstructor();

  // only have a single app-wide reference to the database
  static Database _database;
  Future<Database> get database async {
    if (_database != null) return _database;
    // lazily instantiate the db the first time it is accessed
    _database = await _initDatabase();
    return _database;
  }

  // this opens the database (and creates it if it doesn't exist)
  _initDatabase() async {
    Directory documentsDirectory = await getApplicationDocumentsDirectory();
    String path = join(documentsDirectory.path, _databaseName);
    return await openDatabase(path,
        version: _databaseVersion,
        onCreate: _onCreate);
  }

  // SQL code to create the database table
  Future _onCreate(Database db, int version) async {
    await db.execute('''
          CREATE TABLE $table (
            $columnId INTEGER PRIMARY KEY,
            $columnName TEXT NOT NULL,
            $columnAge INTEGER NOT NULL
          )
          ''');
  }

  // Helper methods

  // Inserts a row in the database where each key in the Map is a column name
  // and the value is the column value. The return value is the id of the
  // inserted row.
  Future<int> insert(Map<String, dynamic> row) async {
    Database db = await instance.database;
    return await db.insert(table, row);
  }

  //The data present in the table is returned as a List of Map, where each
  // row is of type map
  Future<List<Map<String, dynamic>>> queryAllRows() async {
    Database db = await instance.database;
    return await db.query(table);
  }

  // All of the methods (insert, query, update, delete) can also be done using
  // raw SQL commands. This method uses a raw query to give the row count.
  Future<int> queryRowCount() async {
    Database db = await instance.database;
    return Sqflite.firstIntValue(await db.rawQuery('SELECT COUNT(*) FROM $table'));
  }

  // We are assuming here that the id column in the map is set. The other
  // column values will be used to update the row.
  Future<int> update(Map<String, dynamic> row) async {
    Database db = await instance.database;
    int id = row[columnId];
    return await db.update(table, row, where: '$columnId = ?', whereArgs: [id]);
  }

  // Deletes the row specified by the id. The number of affected rows is
  // returned. This should be 1 as long as the row exists.
  Future<int> delete(int id) async {
    Database db = await instance.database;
    return await db.delete(table, where: '$columnId = ?', whereArgs: [id]);
  }
}
I have included comments above each function to explain what each function does. You can always watch the video to get further clearance of the concepts and the working.Now, we can directly access the CRUD functions using the DatabasHelper instance( remember we created a singleton object of the Database Helper class ).All you have to do is just write like db.insert(row) where db is the instance of our DatabaseHelper class and row is nothing but a Map containing column names as the key and values as the values associated with the respective column name.
//{
//  column_name : value,
//  column_name_2 : value,
// }
You will understand this better once we create the UI and implement the functions.So, without wasting any further time let's quickly move onto the UI part
3. Basic UI to implement CRUD operations
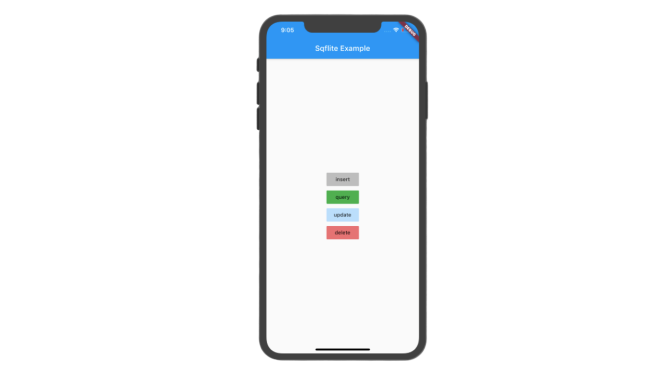
Let's see the UI that we are gonna build for or application. We will have four buttons , each button will perform different CRUD operations and we will print the results in console then.

Rest of the process is pretty simple now. You just have to instantiate the DatabaseHelper class and call the respective methods by passing the required values to get the results.
Below is the code for the UI of this application.
import 'package:flutter/material.dart';
// change `flutter_database` to whatever your project name is
import 'package:flutter_database/database_helper.dart';

void main() => runApp(MyApp());

class MyApp extends StatelessWidget {
  @override
  Widget build(BuildContext context) {
    return MaterialApp(
      title: 'SQFlite Demo',
      theme: ThemeData(
        primarySwatch: Colors.blue,
      ),
      home: MyHomePage(),
    );
  }
}

class MyHomePage extends StatelessWidget {

  // reference to our single class that manages the database
  final dbHelper = DatabaseHelper.instance;

  // homepage layout
  @override
  Widget build(BuildContext context) {
    return Scaffold(
      appBar: AppBar(
        title: Text('sqflite'),
      ),
      body: Center(
        child: Column(
          mainAxisAlignment: MainAxisAlignment.center,
          children: <Widget>[
            RaisedButton(
              color:Colors.grey,
              child: Text('insert', style: TextStyle(fontSize: 20),),
              onPressed: () {_insert();},
            ),
            RaisedButton(
              color:Colors.green
              child: Text('query', style: TextStyle(fontSize: 20),),
              onPressed: () {_query();},
            ),
            RaisedButton(
              color:Colors.blue,
              child: Text('update', style: TextStyle(fontSize: 20),),
              onPressed: () {_update();},
            ),
            RaisedButton(
              color:Colors.red[400],
              child: Text('delete', style: TextStyle(fontSize: 20),),
              onPressed: () {_delete();},
            ),
          ],
        ),
      ),
    );
  }

  // Button onPressed methods

  void _insert() async {
    // row to insert
    Map<String, dynamic> row = {
      DatabaseHelper.columnName : 'Mark',
      DatabaseHelper.columnAge  : 20
    };
    final id = await dbHelper.insert(row);
    print('inserted row id: $id');
  }

  void _query() async {
    final allRows = await dbHelper.queryAllRows();
    print('query all rows:');
    allRows.forEach((row) => print(row));
  }

  void _update() async {
    // row to update
    Map<String, dynamic> row = {
      DatabaseHelper.columnId   : 1,
      DatabaseHelper.columnName : 'Mark',
      DatabaseHelper.columnAge  : 28
    };
    final rowsAffected = await dbHelper.update(row);
    print('updated $rowsAffected row(s)');
  }

  void _delete() async {
    // Assuming that the number of rows is the id for the last row.
    final id = await dbHelper.queryRowCount();
    final rowsDeleted = await dbHelper.delete(id);
    print('deleted $rowsDeleted row(s): row $id');
  }
}
I hope you are able to understand how you can use sqlite in your flutter application to store data in your local storage as tables and create your own database for your application.I am gonna wrap up for this tutorial.Please let me know if yu have any queries through any of the social platforms.All the links are in the footer of this page
Happy Coding !


